Texture2D
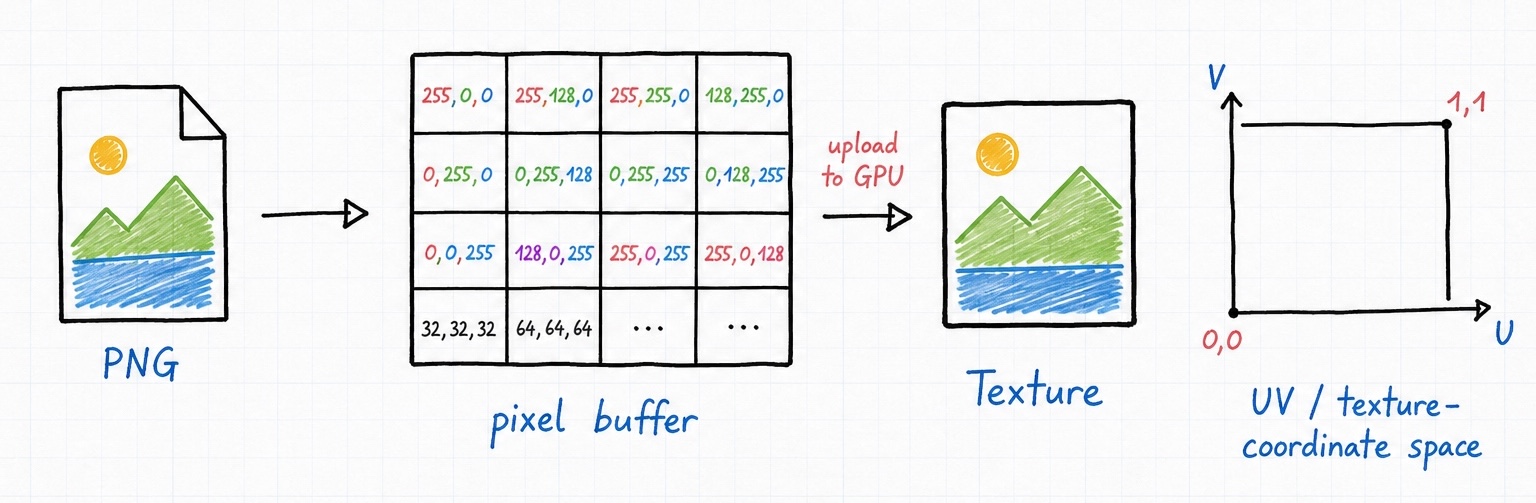
Almost every graphics program eventually needs to get an image into the picture: a logo on a spinning cube, a font atlas for your text, a heightmap you baked earlier, or the noise you just generated in memory. The trouble is that OpenGL has no idea what a PNG is. It wants raw pixels in a buffer, in a layout it understands, and it is your job to get them there.
GL\Texture\Texture2D is the bridge. It reads the common image formats (PNG, JPG, GIF, BMP, TGA, and HDR) from disk into a native pixel buffer you can hand straight to OpenGL, it wraps a buffer you filled yourself so you can treat procedural data as an image, and it writes images back out to disk when you want to save a frame. Under the hood it is backed by the battle-tested stb_image loader, so you get broad format support for free.
Want to see it in action first? A runnable demo ships with the extension:
A Minimal Example
Let's start with the most common thing you'll ever do: load an image from disk and upload it to the GPU so a shader can sample it.
The loading half is a single call. Once you have the texture, you may ask it about its dimensions and channel count:
use GL\Texture\Texture2D;

// load the bundled logo from disk (512x512)
$textureData = Texture2D::fromDisk(__DIR__ . '/phpglfwlogo.png');

echo $textureData->width();    // 512
echo $textureData->height();   // 512
echo $textureData->channels(); // 3 (RGB)
The upload half is plain OpenGL. Texture2D does not create the GPU texture for you, it only hands you the pixels through buffer(). You generate and configure the GL texture yourself, then feed buffer() to glTexImage2D:
// create the GPU texture object and bind it
glGenTextures(1, $texture);
glActiveTexture(GL_TEXTURE0);
glBindTexture(GL_TEXTURE_2D, $texture);

// how the texture behaves when sampled out of bounds, and when scaled
glTexParameteri(GL_TEXTURE_2D, GL_TEXTURE_WRAP_S, GL_REPEAT);
glTexParameteri(GL_TEXTURE_2D, GL_TEXTURE_WRAP_T, GL_REPEAT);
glTexParameteri(GL_TEXTURE_2D, GL_TEXTURE_MIN_FILTER, GL_LINEAR);
glTexParameteri(GL_TEXTURE_2D, GL_TEXTURE_MAG_FILTER, GL_LINEAR);

// upload the pixels: Texture2D gives you the buffer, glTexImage2D does the rest
glTexImage2D(GL_TEXTURE_2D, 0, GL_RGB, $textureData->width(), $textureData->height(), 0, GL_RGB, GL_UNSIGNED_BYTE, $textureData->buffer());

// generate mipmaps so the texture looks good at a distance
glGenerateMipmap(GL_TEXTURE_2D);
Finally, point a sampler uniform at the texture unit you bound to (unit 0 here):
And in your fragment shader, sample it like any other texture:
That's the whole round trip. Everything below is a variation on this same pattern: a different way to get pixels into a Texture2D, or a different thing to do with them once they're there.
Note
Wrapping, filtering, and mipmaps are not properties of Texture2D. They live on the GL texture object and are set with glTexParameteri and glGenerateMipmap at upload time, exactly as above. Texture2D concerns itself only with the pixels, so if you go looking for a filter option on the object, that is why you won't find one.
Loading Images From Disk
The workhorse is Texture2D::fromDisk. In its simplest form you pass a path and get back a texture:
It has two more parameters, and both are worth knowing.
Requesting a Channel Count
By default (0) the image keeps whatever channel count it was saved with: a JPEG comes in as 3-channel RGB, a PNG with transparency as 4-channel RGBA. Sometimes that is not what your shader expects. If you would like to force a specific layout regardless of the file, pass one of the CHANNEL_* constants:
// force RGB even if the file has an alpha channel
$textureData = Texture2D::fromDisk(__DIR__ . '/phpglfwlogo.png', Texture2D::CHANNEL_RGB);
The available constants are CHANNEL_R, CHANNEL_RG, CHANNEL_RGB, and CHANNEL_RGBA (with the aliases CHANNEL_GRAY and CHANNEL_GRAY_ALPHA). They are covered in the reference below. Note the difference from fromBuffer, whose channel argument describes data you already have: here the argument requests a conversion, and 0 means "leave it as the file has it".
Flipping Vertically
Image files store their first row at the top, but OpenGL expects the first row at the bottom, so texture coordinate (0, 0) lands in the lower-left corner. To spare you the headache, fromDisk flips the image vertically for you by default. That is the right behavior for OpenGL textures, so most of the time you leave it alone.
// flipped for OpenGL (the default)
$textureData = Texture2D::fromDisk(__DIR__ . '/phpglfwlogo.png', Texture2D::CHANNEL_RGB, true);
When you feed a texture into the Vector Graphics API instead, its coordinate system already matches the file, so there you will want to pass false to keep the image upright:
// not flipped, for the Vector Graphics API
$logo = Texture2D::fromDisk(__DIR__ . '/phpglfwlogo.png', Texture2D::CHANNEL_RGBA, false);
Warning
If the file cannot be found or decoded, fromDisk throws an \Error ("Failed to load image from disk"). It never returns a half-loaded texture, so you do not need to null-check the result, but you may wish to wrap the call in a try/catch when the path comes from user input.
Choosing the Right GL Format
When you do not know a texture's channel count ahead of time (say you accept whatever the user drops in), let the texture tell you, and pick the matching OpenGL format from channels():
$textureData = Texture2D::fromDisk($path);

if ($textureData->channels() === 3) {
    $format = GL_RGB;
} else if ($textureData->channels() === 4) {
    $format = GL_RGBA;
}

glTexImage2D(GL_TEXTURE_2D, 0, $format, $textureData->width(), $textureData->height(), 0, $format, GL_UNSIGNED_BYTE, $textureData->buffer());
glGenerateMipmap(GL_TEXTURE_2D);
This small helper pattern is exactly what the bundled ExampleHelper::loadTexture() does, and it keeps your upload code working no matter what someone throws at it.
Building Textures From a Buffer
Not every texture comes from a file. Sometimes you generate the pixels yourself: a gradient, a noise field, a chart you rasterized, or a frame you read back from the GPU. For those cases, fill a UByteBuffer with your pixel data and wrap it with Texture2D::fromBuffer:
use GL\Buffer\UByteBuffer;

$width = 256;
$height = 256;

// one RGBA pixel is 4 bytes, so allocate width * height * 4 bytes
$pixels = new UByteBuffer();
$pixels->fill($width * $height * 4, 0);

// ... write your pixels into $pixels ...

$texture = Texture2D::fromBuffer($width, $height, $pixels, Texture2D::CHANNEL_RGBA);
Here the channel argument describes the data you are handing in, so it must match how you laid out the buffer. If you leave it off, it defaults to CHANNEL_RGBA (4 bytes per pixel).
Note
The buffer is not copied. The Texture2D keeps a reference to the very buffer you passed, which is efficient but means you should not free or repurpose that buffer while the texture is still in use.
Single-channel data works just as well. This is how the noise explorer example turns a generated noise field into a grayscale texture and saves it, using CHANNEL_R and quantizing the float noise down to bytes:
$texture = Texture2D::fromBuffer($resolution, $resolution, $noiseBuffer->quantizeToUChar(), Texture2D::CHANNEL_R);
$texture->writePNG('noise.png');
HDR Textures
Ordinary images store each channel as a byte, so every value is pinned between 0 and 1. That is fine for a photo on screen, but it cannot represent the blazing highlights of a real sky or the subtle range an environment map needs for lighting. High Dynamic Range images lift that ceiling: each channel is a full 32-bit float, free to go well beyond 1.0.
Texture2D handles HDR transparently. When you load a .hdr file, it detects the format and gives you a texture backed by a FloatBuffer instead of a UByteBuffer:
$env = Texture2D::fromDisk(__DIR__ . '/studio.hdr');

$env->isHDR();         // true
$env->buffer();        // a GL\Buffer\FloatBuffer
To build one from your own float data, use fromBufferHDR with a FloatBuffer:
use GL\Buffer\FloatBuffer;

$pixels = new FloatBuffer();
// ... push width * height * channels floats ...

$texture = Texture2D::fromBufferHDR($width, $height, $pixels, Texture2D::CHANNEL_RGB);
$texture->isHDR(); // true
Because the buffer type depends on whether the texture is HDR, reach for isHDR() whenever you handle a texture whose origin you do not control, so you know whether buffer() will hand you bytes or floats.
Writing Images to Disk
A Texture2D is not only an input. Once you hold one (whether you loaded it, generated it, or built it from pixels you read back off the GPU) you may write it straight to disk. This is the foundation of screenshots and offscreen rendering.
For standard (LDR) textures you have four formats to choose from, each with its own trade-off:
$texture->writePNG('frame.png');       // lossless, keeps transparency, great default
$texture->writeJPG('frame.jpg', 90);   // lossy, small files, best for photographic/noisy scenes
$texture->writeBMP('frame.bmp');       // uncompressed, full fidelity, large
$texture->writeTGA('frame.tga');       // simple and quick, not space efficient
writeJPG takes an optional quality from 0 to 100 (defaulting to 100). The others take just a path.
For HDR textures, use writeHDR, which preserves the full float range that the LDR formats would clip away:
Warning
The LDR writers (writePNG, writeJPG, writeBMP, writeTGA) work only on LDR textures, and writeHDR works only on HDR textures. Calling the wrong one for the texture's type throws an \Error. Use isHDR() to pick the correct writer when in doubt.
A common pattern is to grab the current framebuffer with glReadPixels and save it. That full workflow, including a note on high-DPI framebuffers, lives on its own page: see Rendering to an Image.
Using Textures in Vector Graphics
If you are working with the Vector Graphics API, you do not upload textures with raw GL calls at all. Instead you hand a Texture2D to imageFromTexture, which uploads it and returns a VGImage you can turn into a fill pattern:
Remember to load the texture with flipVertically set to false for this path, since the Vector Graphics coordinate system already matches the image. The complete story, including repeat and filter modes and how to paint with the result, is covered in Images & Graphics.
Full API Reference
This guide walks through the pieces you reach for most. For the exhaustive list of every method, argument, channel constant, and return type, see the generated Texture2D class reference.
See Also
glTexImage2Dthe OpenGL call that uploads a texture's pixels to the GPU.GL\Buffer\UByteBufferandGL\Buffer\FloatBufferthe native buffers that back LDR and HDR textures.- Rendering to an Image read the framebuffer back and save it with the write methods above.
- Images & Graphics use a
Texture2Das a fill pattern in the Vector Graphics API.