Rendering a Textured Cube
On the last page we built a spinning cube and colored it with its own uv coordinates, that soft blue-to-white gradient that made each face easy to tell apart. It did the job, but a cube painted from raw coordinates is not exactly a photo. Sooner or later you will want a real image on your geometry: a crate, a brick wall, a company logo. That image is called a texture, and wrapping one onto our cube is the goal of this page.
The good news is that almost nothing changes. We keep the same window, the same buffer, the same matrices, and the same depth testing from the cube page. Only two new moves join the party: we load an image from disk, and we sample it in the fragment shader. Let's give the cube a face.

Full Source
This getting started tutorial is based on the examples provided with PHP-GLFW.
You can check out the complete source code here: 03_textured_cube.php
The uv Coordinates Were Waiting for This
Remember the second attribute we packed into every vertex on the cube page, the (u, v) pair we used only for coloring? That was not busywork. Those two numbers are exactly what a texture needs.
Think of uv as an address into the image. The bottom-left corner of the image is (0, 0), the top-right is (1, 1), and every point in between has a fractional coordinate. When you give a vertex a uv of (1, 0), you are saying "pin the bottom-right of the image to this corner of the face." OpenGL smoothly interpolates the uv across the triangle, so every pixel in between knows which part of the image to pull.
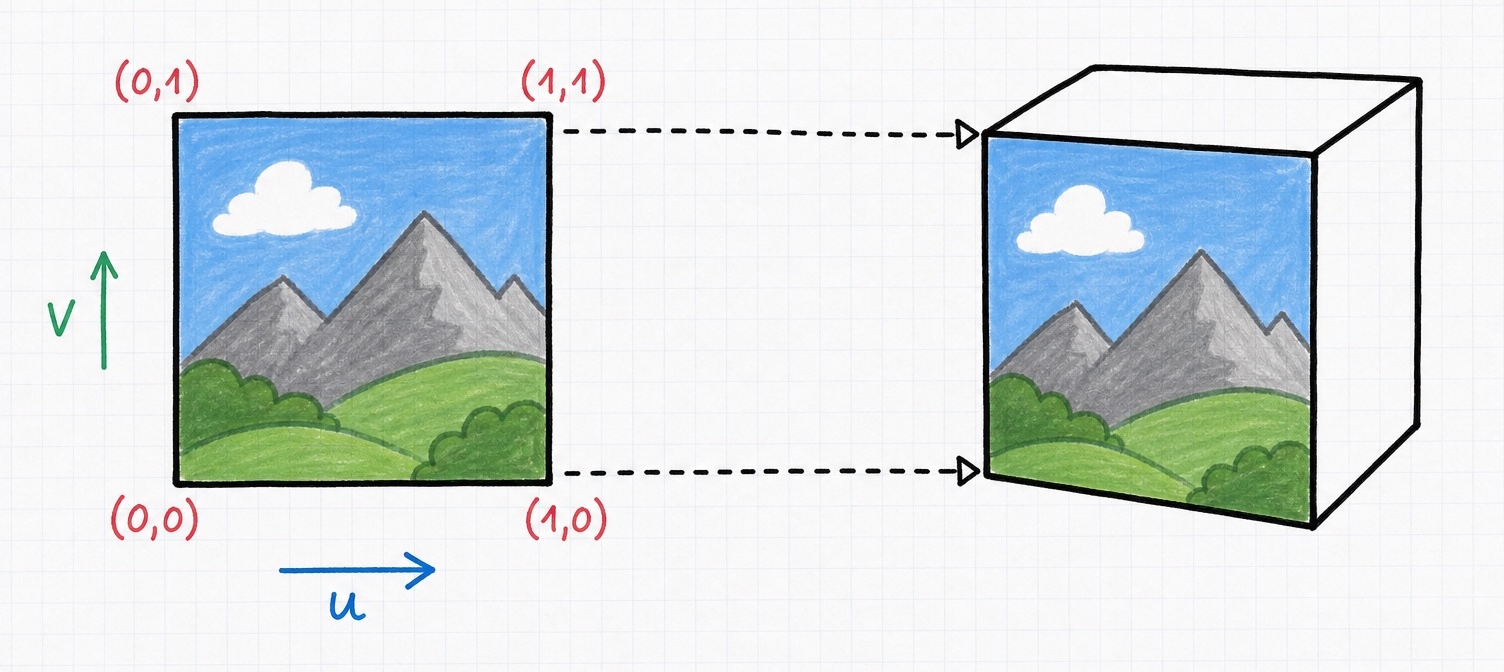
Because our cube's 36 vertices already carry these coordinates, we do not have to touch the vertex data or the attribute layout at all. The buffer, the glVertexAttribPointer calls, the stride of 5 floats: all of it stays exactly as it was on the cube page. We are simply about to put the uv values to their real use.
Loading the Image with Texture2D
First we need the image itself as raw pixels. PHP-GLFW ships with an image loader built on stb_image, wrapped in the GL\Texture\Texture2D class, so you do not have to decode PNGs or JPEGs by hand. You may load one straight from disk:
use GL\Texture\Texture2D;

// decode the logo into a pixel buffer, forcing 3 channels (RGB)
$textureData = Texture2D::fromDisk(__DIR__ . '/phpglfwlogo.png', Texture2D::CHANNEL_RGB);
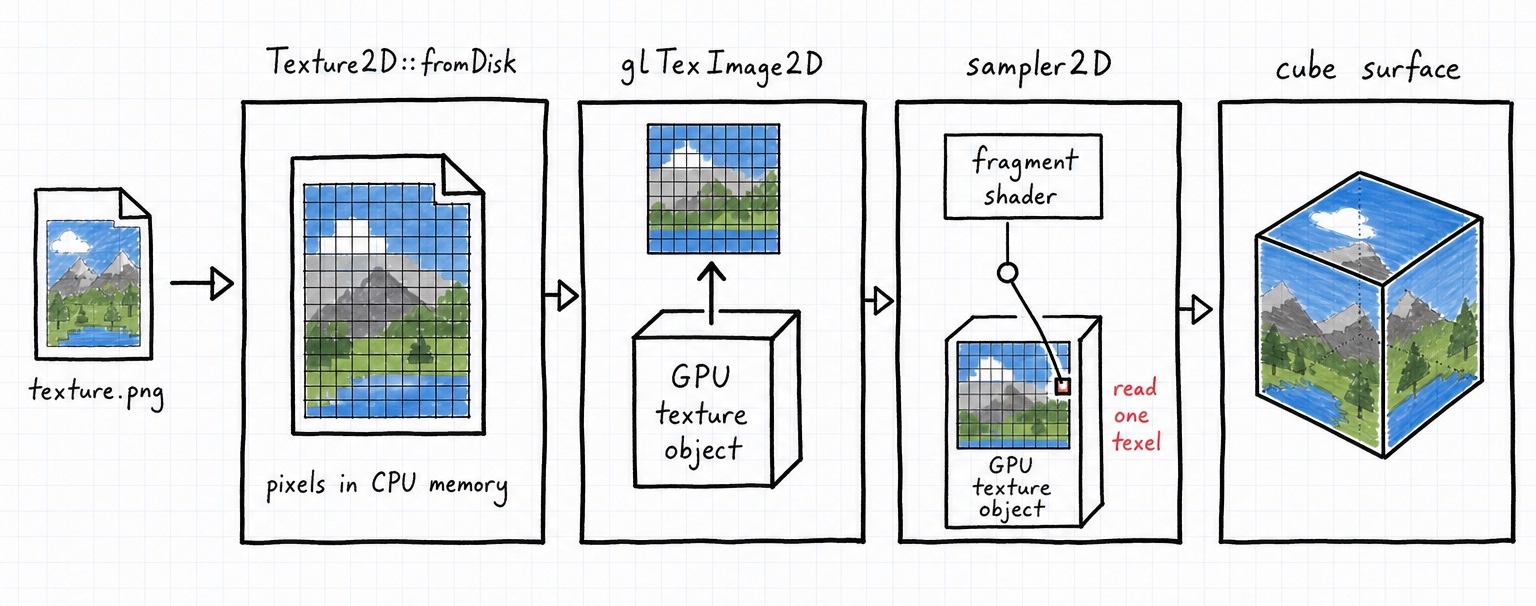
That gives you an object holding the decoded pixels, plus its width(), height(), and a buffer() you can hand to OpenGL. It is worth being clear about one thing right away: a Texture2D is pixels in CPU memory, not something the GPU can draw with yet. The graphics card cannot see PHP's memory. We still have to create a GPU-side texture object and upload the pixels into it, which is the next step.
fromDisk flips for you
fromDisk flips the image vertically as it loads, because OpenGL treats (0, 0) as the bottom-left while image files usually start from the top-left. This is why the logo appears the right way up without any effort on your part. If you ever load an image that comes out upside down, this flag is the first place to look.
Handing the Pixels to the GPU
Now we create the object the GPU actually samples from. This follows the same generate, bind, configure rhythm you already know from the VAO and VBO. We ask OpenGL for a texture handle, pick a texture unit to work on, and bind our texture so the following calls apply to it:
// create the GPU texture object and bind it on texture unit 0
glGenTextures(1, $texture);
glActiveTexture(GL_TEXTURE0);
glBindTexture(GL_TEXTURE_2D, $texture);
With the texture bound, we set a few parameters that tell OpenGL how to read it. Wrapping decides what happens when a uv lands outside the 0 to 1 range, and filtering decides how the image is smoothed when a face is drawn larger or smaller than the image:
// repeat the image if a uv coordinate falls outside 0..1
glTexParameteri(GL_TEXTURE_2D, GL_TEXTURE_WRAP_S, GL_REPEAT);
glTexParameteri(GL_TEXTURE_2D, GL_TEXTURE_WRAP_T, GL_REPEAT);

// smooth the image when it is scaled up or down
glTexParameteri(GL_TEXTURE_2D, GL_TEXTURE_MIN_FILTER, GL_LINEAR);
glTexParameteri(GL_TEXTURE_2D, GL_TEXTURE_MAG_FILTER, GL_LINEAR);
Now the upload itself. glTexImage2D copies the pixel buffer from Texture2D into the bound GPU texture, and glGenerateMipmap builds the smaller pre-scaled copies that keep the texture looking clean when the cube is far away:
// upload the CPU pixels into the GPU texture object
glTexImage2D(
    GL_TEXTURE_2D, 0, GL_RGB,
    $textureData->width(), $textureData->height(), 0,
    GL_RGB, GL_UNSIGNED_BYTE, $textureData->buffer()
);

// build the mipmap chain for smooth minification
glGenerateMipmap(GL_TEXTURE_2D);
That is the whole handoff: Texture2D held the pixels, glTexImage2D moved them onto the card. From here on the GPU has its own copy, and the cube will keep drawing even if you let the Texture2D object go.
The wrapping, filtering, and mipmap options each have more to them than we need today. When you want the full menu, the Textures reference covers every parameter and when to reach for it.
Pointing the Sampler at the Unit
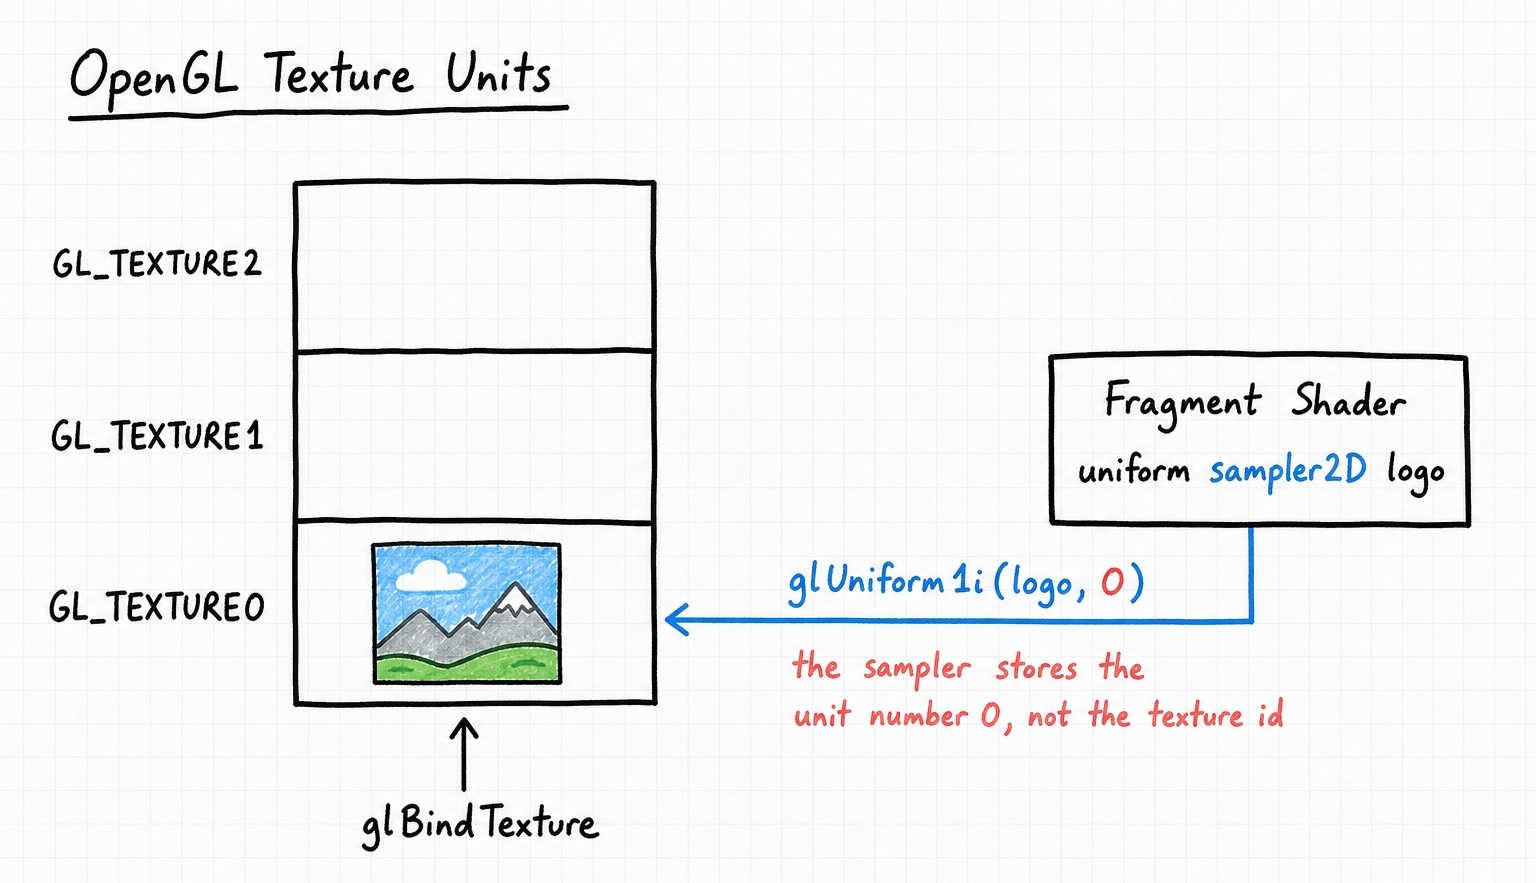
There is one small piece of wiring left. Our shader is about to read the texture through a sampler2D, but how does the sampler know which texture to read? The answer is texture units. We bound our texture on unit 0 a moment ago, so we just tell the shader's sampler to look at unit 0:
// the shader must be active before setting its uniforms
glUseProgram($cubeShader);

// point the `logo` sampler at texture unit 0
glUniform1i(glGetUniformLocation($cubeShader, 'logo'), 0);
The sampler stores a unit, not a texture
Notice that we pass 0, not the texture handle from glGenTextures. A sampler2D uniform holds a texture unit index, and OpenGL looks up whichever texture is bound to that unit at draw time. It feels like an extra hop at first, but it is what lets a single shader read several textures at once, each on its own unit.
The Shader
The vertex shader does not change at all. It still receives the three matrices and passes the interpolated uv through to the fragment shader, exactly as it did on the cube page. So we will leave it be and look only at what is new.
The fragment shader is where the texture finally appears. Instead of turning the uv into a color by hand, we declare a sampler2D uniform and let the texture() function fetch the right pixel for us:
#version 330 core
out vec4 fragment_color;

in vec2 v_uv;

// the texture, living on the unit we pointed it at from PHP
uniform sampler2D logo;

void main()
{
    // sample the image at this fragment's uv coordinate
    fragment_color = vec4(texture(logo, v_uv).rgb, 1.0);
}
texture(logo, v_uv) is the whole trick: hand it the sampler and a uv coordinate, and it returns the color of the image at that spot. Because v_uv is interpolated smoothly across each triangle, the image stretches neatly over the face. Compiling and linking these shaders works just as it did on the triangle page, so we will not repeat it here.
The Draw Loop
Here is the reassuring part: the draw loop is the same one from the cube page. We still clear the color and depth buffers, still rebuild the three matrices so the cube keeps spinning, and still draw 36 vertices. The texture needs no per-frame attention, because it stays bound to its unit until we change it:
while (!glfwWindowShouldClose($window))
{
    glClearColor(0, 0, 0, 1);
    glClear(GL_COLOR_BUFFER_BIT | GL_DEPTH_BUFFER_BIT);

    glUseProgram($cubeShader);

    // rebuild the matrices so the cube animates (unchanged from the cube page)
    $model = new Mat4;
    $model->rotate(glfwGetTime() * 0.5, new Vec3(0.0, 1.0, 0.0));
    $model->rotate(glfwGetTime() * 0.5, new Vec3(0.0, 0.0, 1.0));

    $view = new Mat4;
    $view->translate(new Vec3(0.0, 0.0, -2));

    $projection = new Mat4;
    $projection->perspective(GLM::radians(70.0), 800.0 / 600.0, 0.1, 100.0);

    glUniformMatrix4f(glGetUniformLocation($cubeShader, "model"), GL_FALSE, $model);
    glUniformMatrix4f(glGetUniformLocation($cubeShader, "view"), GL_FALSE, $view);
    glUniformMatrix4f(glGetUniformLocation($cubeShader, "projection"), GL_FALSE, $projection);

    // bind & draw the cube: 36 vertices, 12 triangles, now textured
    glBindVertexArray($VAO);
    glDrawArrays(GL_TRIANGLES, 0, 36);

    glfwSwapBuffers($window);
    glfwPollEvents();
}
And that is it. The same 36 vertices that drew a gradient cube last time now draw a logo-wrapped one, purely because the fragment shader reads from an image instead of inventing a color. When the loop ends, clean up as before:
Full Source Code
The full, runnable example is here: 03_textured_cube.php. Run it with:
Where to Go Next
You can now put any image onto any surface, which is one of the biggest visual leaps in real-time graphics. From here you might:
- Explore every texture option (wrapping modes, filtering, HDR images, writing images back to disk) in the Textures reference.
- Get comfortable with the shaders that read those textures in the Shaders guide.
- Load a real model with its own texture coordinates instead of a hand-typed cube, using the Wavefront Object Files parser.